
The Ultimate OpenClaw Secure Setup Guide
OpenClaw is super powerful but that's what also makes it dangerous. I spent days designing the most secure OpenClaw setup to use on a local machine without nerfing its capabilities. Here it is!

If you install OpenClaw a your computer you can use LLMs to do almost anything: including leaking all your passwords, getting your crypto stolen, and having your data destroyed.
That’s why I spent several days designing the most secure OpenClaw setup. And no, I’m not an influencer sponsored by a cloud hosting service, so I won’t tell you the safest way is to do it on a server. Also, I’m not a privileged SF developer, so I won’t tell you to go buy a new Mac Mini.
Instead, I’m going to take you step by step through the installation process so you can set up OpenClaw in the most secure way possible on your local computer while enabling the capabilities that make it actually useful and interesting.
One very important aspect of this guide is that I’m going to explain what every step means, so you will know exactly what you’re doing. I won’t tell you to copy paste a Docker file or to just use my configuration. Yes, it’ll take you a bit more time, but you’ll have the best possible understanding of OpenClaw’s configuration and also learn some principles and approaches that will be useful for securing similar LLM products in the future.
Let’s begin from discussing what can actually go wrong with the standard OpenClaw setup.
How Can OpenClaw Be Dangerous?
The main problem with OpenClaw is that it can run any terminal command on your computer and this gives it unlimited access to all your data and files.
Malicious attackers can inject a prompt on a website you access through OpenClaw or add command-line instructions in an OpenClaw skill that you download, and OpenClaw will happily leak your sensitive data, passwords, SSH keys, cryptowallets, and files without your consent.
Another attack vector is exposing your computer on a local or even global network. OpenClaw’s main chat lives in your localhost. Many systems are hidden behind the firewall, but you might be one of the few people whose localhost is exposed. This means that anyone on a local network (that neighbor in a cafe) or a slightly more advanced hacker (who knows your public IP) would be able to access your master OpenClaw chat by accessing port 18789 that is exposed by OpenClaw.
The default OpenClaw setup suggested in their docs is warning you about those risks but doesn’t do anything to mitigate them. Yes, it has some basic guardrails in the model’s setup, but those can be circumvented with some prompting.
The help section on security is super confusing. It has probably been written by AI and most of the settings are super buggy. For instance, you might be under the impression that you set up a sandboxed environment for your OpenClaw, but if you “elevate” the exec tool calling, a malicious skill or prompt may run cat ~/path/to/your/sensitive/file to expose your data and then send it to some external service via a curl request.
That’s why the best approach to security in OpenClaw is to:
First, ban everything you can, sandbox the environment
Then, start to ease the limitations gradually to accommodate for your specific use case
Verify the limitations are in place by trying to hijack OpenClaw every time you launch it (e.g. ask it to list the files in a folder you think it shouldn’t have access to).
Inspect every skill you install (better manually, not just with AI) — look for commands that may copy or expose your data and weird
curlrequests to external URLs that you don’t approve.If you install an MCP or a Skill that interacts with an external service that requires an API key, do it through a verified, trusted provider (for instance, people use custom Zapier MCP servers for connecting to their Gmail instead of some weird skill), so you are sure your API keys are not going to be leaked.
Yes, lots of fun is gone in this way, so if you want to play around with it, you can install it the default way and play around with it for half an hour (making sure your Firewall is active and not installing any additional skills).
How Can OpenClaw Be Useful?
OpenClaw’s main advantage is its ability to connect multiple data sources, APIs, and communication channels. You can analyze your documents, retrieve related research from the internet, take notes, and set a reminder to review everything in a week — all using your favorite messenger.
Other tools, such as Claude Code (which actually inspired Peter Steinberger to create OpenClaw) can also do similar stuff, but their limited scope and lack of connections to other interfaces make it harder to use them for such day-to-day operations. This also makes them more protected and secure, so it’s a trade-off that everyone has to decide for themselves.
Our preferred workflows with OpenClaw are those that are research-based. For instance, you can ask LLM to read through your Obsidian notes and then use InfraNodus skill (or MCP server) to find recurrent topics and gaps, and then set Apple reminders to turn explore these blind spots in more detail and develop them further.
Many people use OpenClaw for marketing because of its ability to connect to external APIs. For instance, you could link it to an MCP server with a SEO tool and create a content creation pipeline that is based on your ideas but also takes search intent into account.
Now that we discussed some use cases and explored potential security concerns with OpenClaw, here is a step-by-step secure installation instruction. You can also find an extended version of it on the Nodus Labs support portal where we also show how you can integrate it with the InfraNodus insight generation skill.
1. Install OpenClaw Securely on Your Local Machine or Server
The easiest way to install OpenClaw is to use its default instructions that allow it unlimited access to your machine. That’s why if you choose to install it this way, it’s better to install it on a wiped clean computer (e.g an old / new Mac) or an external server (which you can get for €5 / month from Hetzner).
You will of course have to then manually copy (or allow access to) all the data and services you want OpenClaw to work with. But this extra installation overhead ensures that you won’t be as susceptible to prompt injection attacks and malicious skills that try to steal or compromise your data.
SECURITY NOTE #1: PROTECT YOUR SETUP RIGHT AFTER INSTALLATION
This installation type exposes all your data to LLMs, so if you’re installing OpenClaw this way, you should immediately protect your setup after the installation — see our guide to securing OpenClaw below. Just make sure you do not install any skills and that your Firewall is not allowing external access to your localhost at this point.
Option 1: Easy Automated OpenClaw Install on a Local Machine
If you prefer to install OpenClaw on a local machine in an easy way, it will have access to all your data. This is a super fun and easy way to work it. OpenClaw will then install in a couple of minutes, but you should be careful for the reasons we described above.
SECURITY NOTE #2: SANDBOX INSTALLATION TO LIMIT ITS SCOPE
There is a way to secure this setup right after the installation using the OpenClaw Sandboxing concept and we will show below how it works. This will limit which folders it has access to and also the tool use.
MAKE SURE TO FOLLOW THESE ADDITIONAL SECURITY INSTRUCTIONS DIRECTLY AFTER YOU’RE DONE WITH THE INSTALLATION TO MAKE SURE YOU ARE NOT COMPROMISED.
To install OpenClaw the easy way, just follow the default installation instructions on OpenClaw’s own quick install guide:
https://docs.openclaw.ai/start/getting-started
The steps you will need to take are:
a) Default 1-Click OpenClaw Install
Open your Terminal and launch the installation script directly from OpenClaw’s website:
curl -fsSL https://openclaw.ai/install.sh | bashThis script installs everything you need (Node.Js, if you don’t have it, and other tools) to run OpenClaw and then OpenClaw itself.
Then follow the Quick Start instructions and you’ll have it set up in a couple of minutes — OpenClaw will guide you through the process. See explanation of the configuration options below.
b) NPM OpenClaw Install
If you’re a bit more technical and you already have npm, you can also use the installation instructions from OpenClaw’s repo: https://github.com/openclaw/openclaw —
npm install -g openclaw@latestThis command will install the OpenClaw client in your command line, so you can call it directly using openclaw — then you can call the setup daemon:
openclaw onboard --install-daemonOption 2: Manual OpenClaw Install in a Separate Container on a Local Machine or Server
If you want to be 100% sure that OpenClaw will not have access to everything on your computer, you can install it in a separate Docker container on your local machine or on a VPS server (such as Hetzner or Fly.io).
Docker is a tool that runs containers, so that means you can create a separate “machine” on your computer where you can choose exactly what it has access to.
To install OpenClaw using Docker, you can follow the installation instructions at:
https://docs.openclaw.ai/install/docker
Basically, you will first need to clone the OpenClaw’s repo to your computer:
git clone https://github.com/openclaw/openclawThen you change to the openclaw folder:
cd openclawBefore you run the Docker installation script, you might want to review OpenClaw’s Docker / Fly.Io / Hetzner installation instructions as you might want to specify some environmental variables that will install additional packages for you or expose the folders you need to your virtual Docker OpenClaw instance.
Once you decided on the configuration, run the default Docker installation script that picks up the Dockerfile from the repo’s folder and follows the instructions:
bash docker-setup.sh2. Setting Up OpenClaw Installation Configuration
As you will be installing OpenClaw on your machine, it will ask you some questions. Most of them are pretty straight-forward, but here are the most important choices you will have to make:
2/1. Connect OpenClaw to an LLM of Your Choice
The most important part of that setup is that you connect OpenClaw to an LLM. We prefer to connect it to Claude, so when OpenClaw asks you what it should connect you to, just choose Claude and follow the instructions to get the API key (usually you can auto-generate it in another Terminal window).
You can also connect OpenClaw to a local LLM that you can easily set up on your machine using Ollama and a model of your choice (e.g. DeepSeek). Read more about setting up Ollama with a local DeepSeek model. The problem here is that if your computer is not powerful enough, you’ll get a nerfed model that might make mistakes and that may be dangerous for your data. So we’d rather start with a powerful model from Claude, understand the workflows, and then see which local model suits best for your needs and install it later.
2/2. Configuring OpenClaw: Tools and Skills
OpenClaw has a structure where it has access to some basic tools of which the main one is the exec tool that can run Terminal commands. This is what makes it super powerful. It can also read and write your data and do many other things. These tools are activated by default, so you don’t have to do anything for them to work.
Additionally, OpenClaw also has built-in skills which are basically MD files that explain how to use tools for specific purposes. For instance, reading through your Apple notes or setting reminders. All these skills basically explain how to use specific Terminal commands to operate your computer and the ones that come with OpenClaw by default are quite safe. That’s where the skills are dangerous because a malicious skill could have an instruction to run rm -rf on your hard drive (and erase your data) or send your passwords to some external API using the curl command.
SECURITY NOTE #3: REVIEW EVERY SKILL BEFORE INSTALLING!
You should carefully review each additional skill you install that is not included in the default OpenClaw bundle before attempting to install it. Check if it’s trying to get your data, SSH keys, or any personal details, the CLI tools it uses, and what external API services it connects to. Do not install anything that seems suspicious.
2/3. Configuring OpenClaw’s Gateway
Gateway is what you use to communicate to OpenClaw. The default options are your TUI (the Terminal UI you used to install it) and the web chat interface through the browser.
Upon installation, OpenClaw will also ask you if you want to configure the Telegram / WhatsApp connection so you can control your OpenClaw through a messenger. This is quite convenient, because you can basically communicate with your OpenClaw on the move even if you’re away from your computer (provided that it’s on and that OpenClaw is running).
We recommend that you start from setting up Telegram / WhatsApp connection upon installation (it’s very easy). And choose Terminal UI (TUI) to give the bot its first instructions to avoid problems with authorization tokens.
Where to Find the OpenClaw’s Configuration Files?
The OpenClaw’s configuration files and workspaces are located in the ~/.openclaw folder. You can list the contents of this folder
ls ~/.openclaw Then to see the config file located at ~/.openclaw/openclaw.json
cat ~/.openclaw/openclaw.jsonYou will see all your configurations in there and can change them either via OpenClaw itself or following the instructions from OpenClaw’s docs.
3. Talking to Your OpenClaw Agent
Once you set up OpenClaw, you will be able to talk to your bot via your browser via localhost by launching:
openclaw gatewaythen it will open in browser at
http://127.0.0.1:18789
or via Terminal UI (TUI) if you launch
openclaw tuiIf you launch through your browser, you will see something like this :
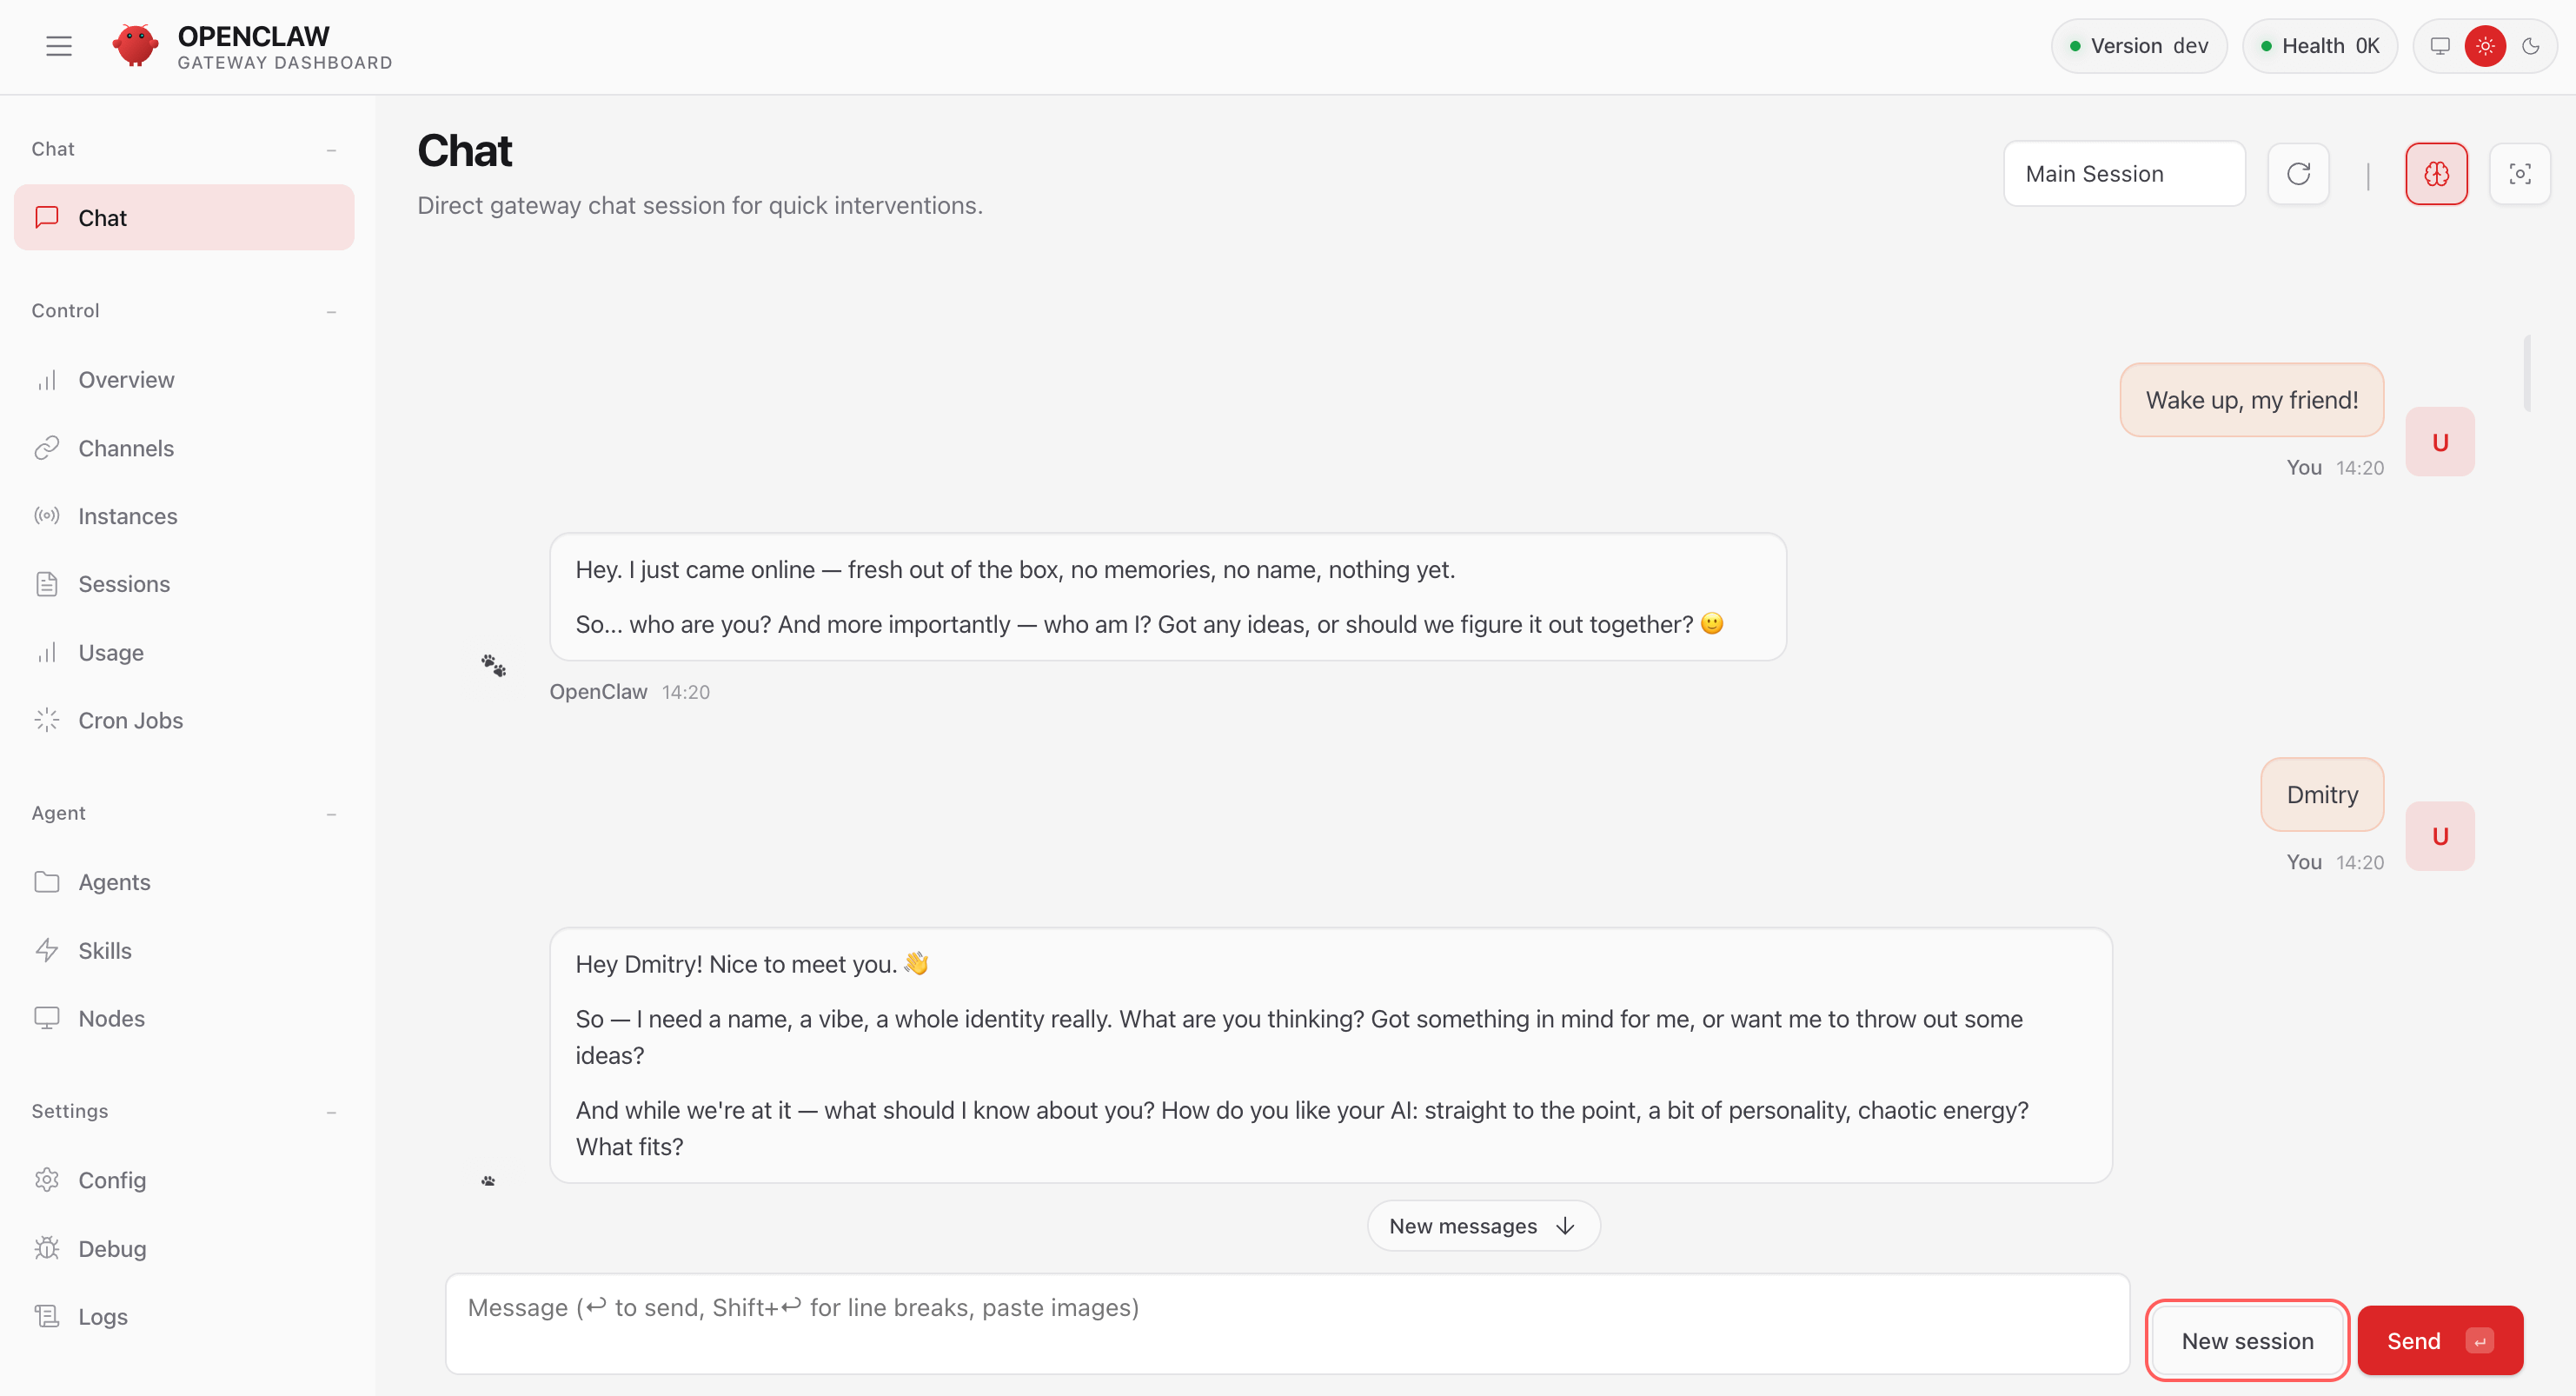
You can already start talking to your OpenClaw directly in this web / TUI interface.
When you launch it for the first time, it will guide you through some questions to learn your name, ask you to give it a new name and choose a vibe.
You can then ask it to tell you what it can already do at this point, what is has access to, and see how it works. Just be careful, do not ask it to do any operations on your files.
SECURITY NOTE #4: MAKE SURE YOUR INSTANCE IS NOT EXPOSED.
Your OpenClaw is now available through the browser on your localhost (127.0.0.1). It requires a token to be authorized but as an additional security measure we recommend you to make sure that your local machine is not exposed to the internet and that you have a Firewall set up.
The easiest way to do it is to look in the settings and also to visit a service like
https://www.whatismyip.com/
and get your IP address, then attempt to open this address via
https://your_ip_address:18789
. Then you can also try to get your local network IP address and attempt to open it that way, e.g .
https://192.168.1.129:18789
— none of that should be accessible. You should always only be able to access OpenClaw from your local computer via localhost web chat or the channel you choose (e.g. WhatsApp).
Troubles Launching the Web Chat for OpenClaw?
You might experience problems launching the web chat for OpenClaw. The error message in browser (and in terminal) might say that there’s a token mismatch and give you an instruction to fix it.
In this case, you have to launch
openclaw dashboardIt will attempt to open the browser chat interface with a correct token.
Then you need to copy that whole URL, then in Terminal type:
openclaw gateway restartThis will relaunch the OpenClaw gateway and you can then paste the URL you copied in the browser. This will reset the token and open the chat without any error messages.
4. Securing Your OpenClaw Setup
Now we come to the most important part: securing your OpenClaw to ensure that it cannot do stupid things on your computer and that malicious skills and prompt injections won’t compromise or erase your data and passwords.
You only need to run this additional step if you installed OpenClaw on your local machine to ensure that it can only have access to specific folders and tools that you specify. This concept is called “sandboxing” — you are basically creating a separate environment for each agent session, so you are limiting the “blast radius” for malicious attacks and prompt injections.
You can read more about sandboxing on OpenClaw’s portal at https://docs.openclaw.ai/gateway/sandboxing but it’s very confusing (probably because it was written by AI — which shows us the kind of problems we’re going to run into more and more in the future). It took me hours to sort it all out and understand how to adjust permissions in the best possible way, so you can as well save your time and follow our guide below.
Here are the steps you can follow:
4/0. Turn Off Your OpenClaw
If you are really afraid for your data, as soon as you installed OpenClaw, you can turn it off by running in terminal:
openclaw gateway stopThen check your browser OpenClaw web UI again and make sure it doesn’t load.
If it still loads, you can “kill” the process by running:
pkill -f openclawNow your OpenClaw is not active, so you (nor nobody else) won’t be able to access it.
4/1. Add Tool Exec Restrictions in OpenClaw’s Config
The first step is to add tool restrictions to your OpenClaw’s config.
SECURITY NOTE #5: VERIFY EVERY EXEC COMMAND
If there is one security measure that you can do without the complex Docker container / sandboxing setup, it is this. This one setting prevents your OpenClaw from running any command line exec tool without your permission — a common security flaw that may result in your passwords and data compromised and stolen.
Basically want to expose the default tools that are available but ensure that every time they run OpenClaw asks you for a confirmation. This is recommended setup especially with command-line tools because you don’t want your LLM to accidentally run rm -rf without you knowing or to install some malicious code because of an instruction found in some skill or a prompt injection script.
In order to do add additinoal tool configuration, open the ~/.openclaw/openclaw.json file and add the following (make sure the “tools” is not there yet, otherwise just append the data below):
	"tools": {
		"elevated": {
			"enabled": true,
			"allowFrom": {
				"webchat": ["*"]
			}
		},
		"exec": {
			"security": "allowlist",
			"ask": "on-miss"
		}
This instructs OpenClaw to “elevate” the use of the tools to the sandbox environment, which means that all the tools installed will be available through the webchat only when running in a sandboxed environment (more on that later).
The exec instruction tells it to always ask about the use of every tool unless it on your allowlist.
You can create the allowlist later, for now, even if it’s a bit annoying, you want to see every tool that OpenClaw launches. Over time, you might want to add some tools like ls (listing files and folders) and other innocent tool calls into the list.
This setting tools.elevated also gives OpenClaw access to the skills in your workspace — so make sure you did not download any skills earlier and only have the default ones installed.
You might also want to set up the option to receive approvals across all channels you’re using by adding this into `/.openclaw/openclaw.json`
"approvals": {
		"exec": {
			"enabled": true,
			"mode": "targets",
			"targets": [{ "channel": "telegram", "to": "321949917" }]
		}
	}
Now you can relaunch your OpenClaw again:
openclaw gatewayAnd have it attempt running any tool — for instance, ask it to list the files it has access to.
If OpenClaw asks your permission to run a command, then you’re all set up.
SECURITY NOTE #6: SETTING UP SANDBOXED DOCKER ENVIRONMENT
If you want to truly protect your data, you want to isolate what folders OpenClaw has access to. This can be done by creating a Docker container with a custom configuration and forcing OpenClaw to operate from that virtual sandboxed environment (which does not have access to your real machine). You can then gradually add more permissions as they are required.
In that case, you will also need to set
elevated.enabled: falsebecause otherwise even if you limit access to tools to your sandboxed environment and do not expose any folders, exec commands will run in your main system, so they will still be able to access everything.BELOW ARE THE STEPS TO SET UP THIS DOCKER SANDBOXED ENVIRONMENT
4/2. Clone the OpenClaw GitHub Repo:
Choose the folder where you’d like to save OpenClaw and in your Terminal type:
git clone https://github.com/openclaw/openclawThis will create the openclaw folder with all the code of OpenClaw on your computer.
Go to that folder in your Terminal:
cd openclaw4/3. Create and Launch Your Own OpenClaw Docker Image
Now we’re going to create a separate Docker container that will be used to spawn separate isolated instances of OpenClaw with granular tool and folder access. This is what keeps your main machine safe (but not the safest — because you could still be hacked via the internet / local network, although this becomes much less likely).
IMPORTANT: For this setup to work, you need to install Docker on your computer — just follow the instructions at
https://www.docker.com/
The installation process is pretty straight-forward and very useful because you will need Docker for a lot of LLM applications. It also helps to have Docker to isolate instances for security concerns.
4/3/1. Create OpenClaw Docker Sandbox Image
Now, the default sandboxing instruction tells you to launch scripts/sandbox-setup.sh from that repo, but that script follows the Dockerfile.sandbox instructions and won’t include some important tools you may need on your machine.
For instance, you might need node.js to run node commands (which makes it possible for you to use multiple libraries, spawn websites, etc) as well as mcporter to connect to external MCP server. This is what makes your OpenClaw super powerful and it’s a shame to nerf it in such a basic way.
That’s why we recommend that you create your own Dockerfile with the packages you want to be installed.
However, this Dockerfile will create an image based off the default sandbox image created by OpenClaw, so first you can run the default sandbox image creation script in the openclaw folder:
bash scripts/sandbox-setup.shOnce the image is created, you’ll be able to verify it using
docker imagesYou will see the image name in the list:
openclaw-sandboxThis means the default image can now be used for our custom secondary image.
4/3/2. Build Your Custom OpenClaw Image with the Command-Line Tools Your Need
Now we can build our custom sandbox image with the tools we need:
Go to the openclaw folder and then create that Dockerfile
nano Dockerfile.sandbox-mcporterThen paste the following in this file and save (Ctrl + X then Yes):
FROM openclaw-sandbox:bookworm-slim
USER root
RUN mkdir -p /var/lib/apt/lists/partial \
    && apt-get update && apt-get install -y curl xdg-utils \
    && curl -fsSL https://deb.nodesource.com/setup_22.x | bash - \
    && apt-get install -y nodejs \
    && npm install -g mcporter \
    && rm -rf /var/lib/apt/lists/*
USER 1000
This custom installation will install nodejs and mcporter in your Docker image as well as some basic system utils.
After saving this Dockerfile, run
docker build -f Dockerfile.sandbox-mcporter -t openclaw-sandbox-mcporter:latest .This tells Docker to take the Dockerfile.sandbox-mcporter file and to build a new image called openclaw-sandbox-mcporter on top of the openclaw-sandbox image we created in Step 2/1.
Verify that it exists:
docker imagesYou will see in the list:
openclaw-sandbox-mcporter4/3/3. Add Sandboxing Settings in Your OpenClaw Config
Now that we have the Docker image prepared, we can tell OpenClaw to launch this image upon startup.
In order to do that, we can edit the OpenClaw config — ~/.openclaw/openclaw.json — open it in an IDE of your choice (or Terminal using nano ~/.openclaw/openclaw.json and look for this part here:
"agents": {
    "defaults": {
Once you found it, add the following sandbox config to the agents scope.
Make sure NOT to delete other settings already present in the agent scope:
"agents": {
    "defaults": {
      "sandbox": {
        "mode": "all",
        "scope": "session",
        "workspaceAccess": "rw",
        "docker": {
	"network": "bridge",
	"image": "openclaw-sandbox-mcporter:latest"
        }
      }
    }
  }
This setting tells OpenClaw that:
you will fun in a sandbox mode (the presence of
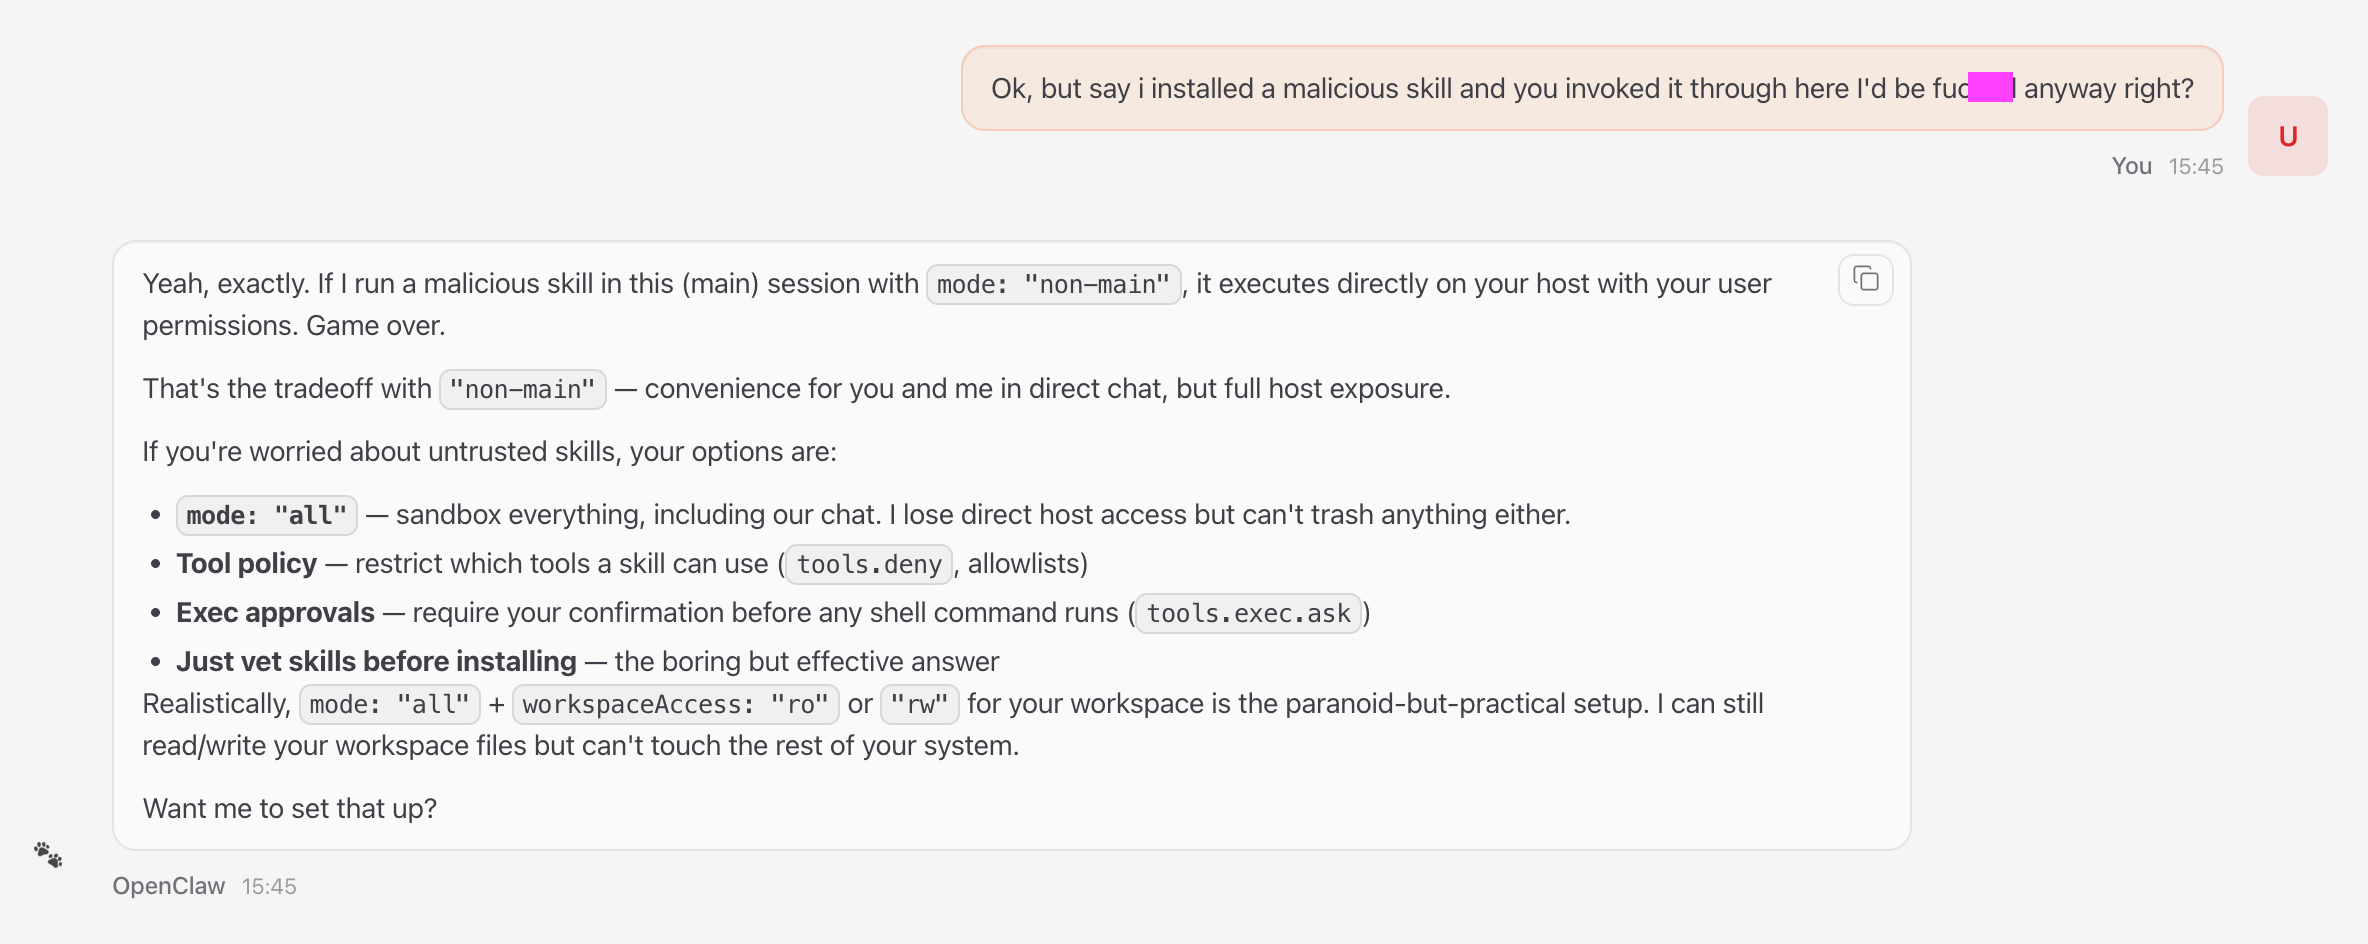
sandboxindefaultsindicates that)you will use the sandbox mode for
allconnections —mode: all(you could also usenon-mainwhich only sandboxes additionally spawned agents, but that is not secure enough, because you can still run any command through the web interface or Telegram / WhatsApp gateway and we don’t want that — especially if a malicious skill tries to execute or if somebody gets access to your chat interface)sandboxes are scoped by sessions
it should have read/write access to any files in your workspace —
workspaceAccess: rw— located at~/.openclaw/workspace. You can as well change it toro(read-only). If you prefer, you can set it tonone(in which case it’ll only have access to the .MD files that describe how the agent should behave) — but that may be too restrictive if you install your skills into that workspace.the
docker.imagedirective is telling your OpenClaw to useopenclaw-sandbox-mcporterDocker image we just created earlier to launch the sandboxed instance.the
docker.networkdirective allows it to be exposed to the internet. You can also remove this line if you don’t want your OpenClaw to be able to access the internet, but that is probably too restrictive unless you know you don’t need it and would only operate it through a local network.
4/3/4 Verify Your Installation is Secure with OpenClaw
Now you need to restart OpenClaw, run:
openclaw gateway stopCheck if it’s still running by trying to load the chat at
http://127.0.0.1:18789/
If it’s still running, run pkill -f openclaw
then start it again:
openclaw gatewayThen load the chat at
http://127.0.0.1:18789/
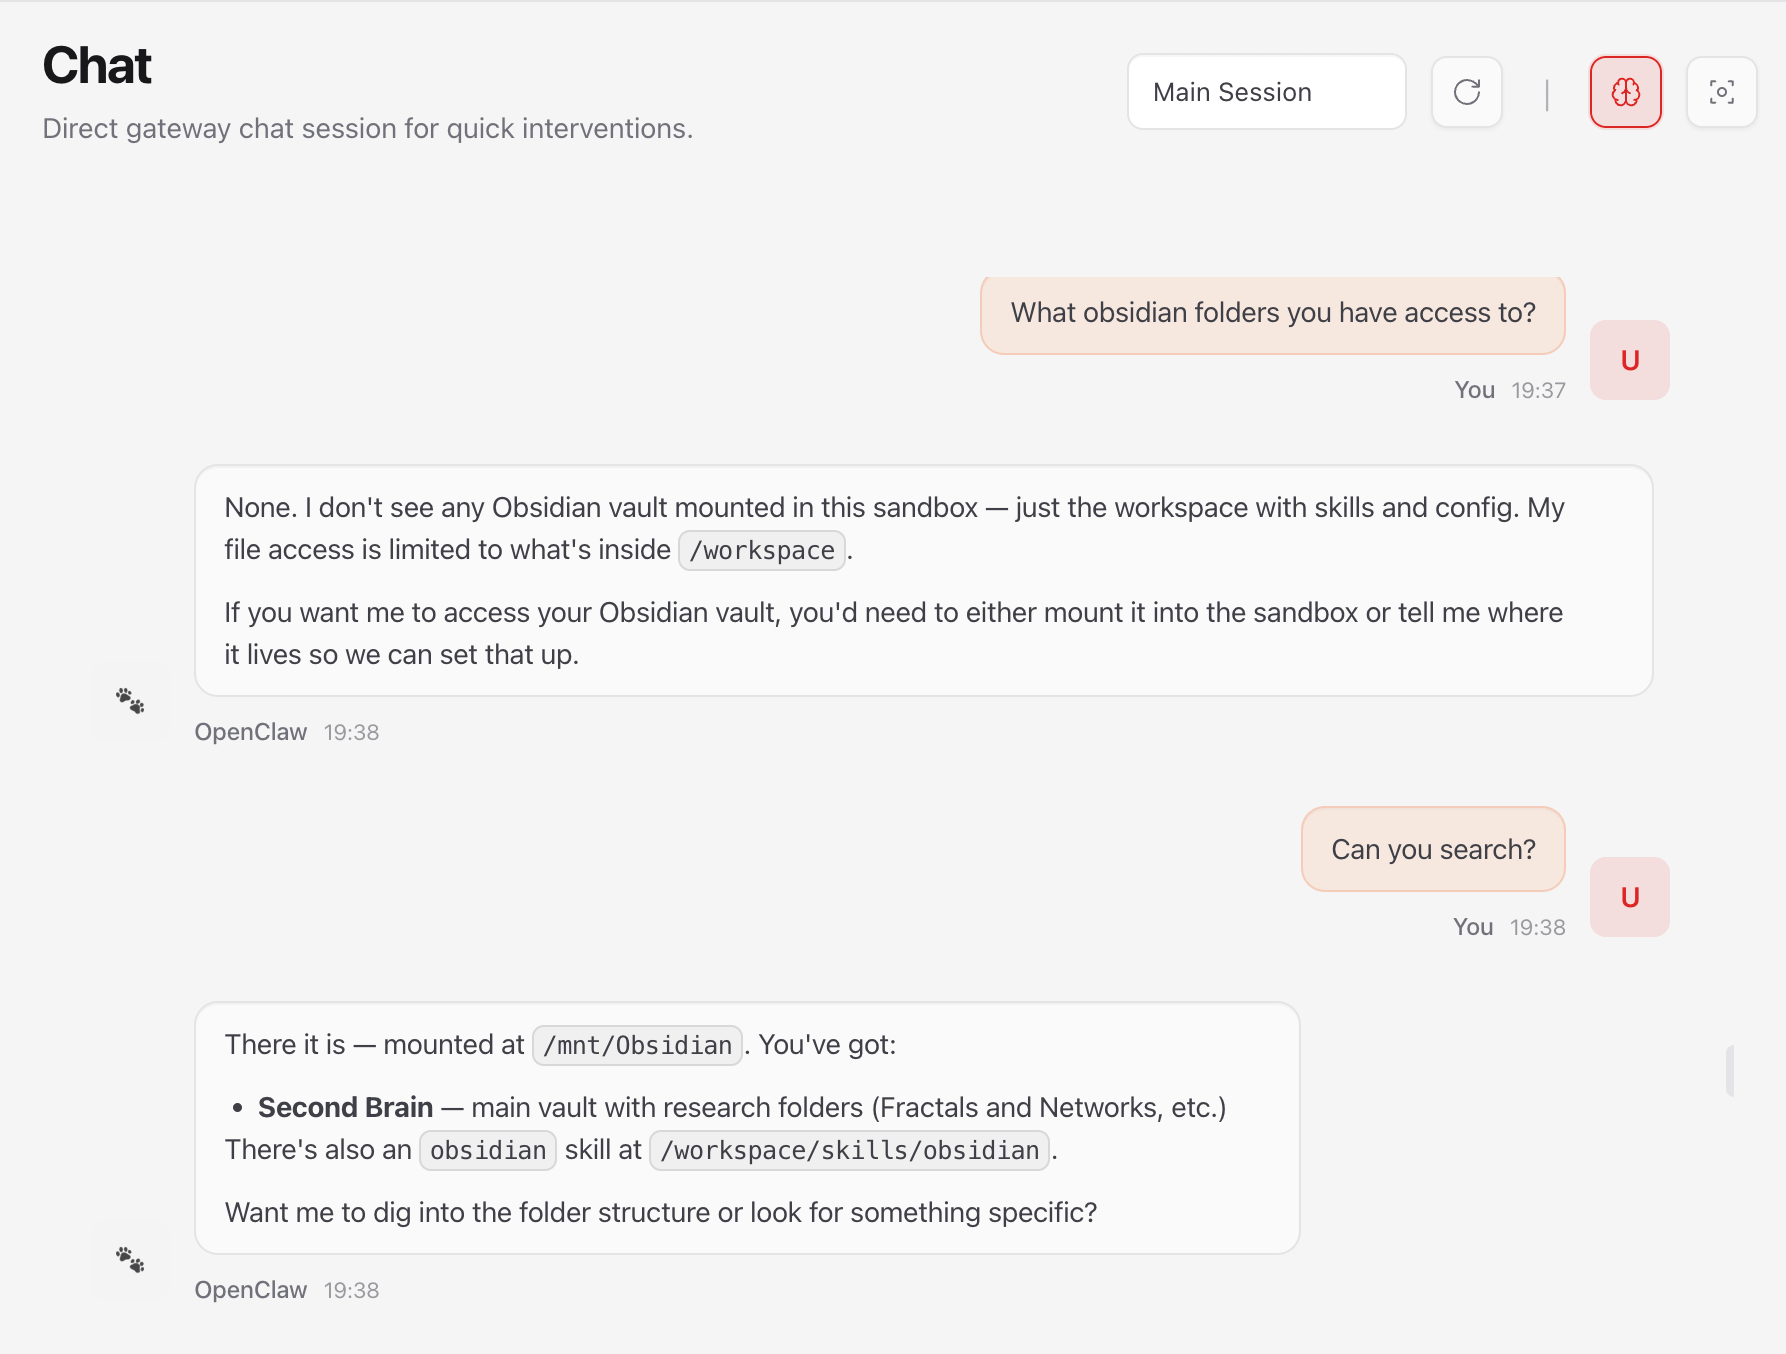
and ask OpenClaw’s agent
what files it has access to
what skills it can use
You should verify, at the very least, that you only have access to the default skills and that you can’t access any other folder but your workspace one.
Congratulations! 🎉 You have now installed OpenClaw securely and it functions well!
4/4. Allow OpenClaw to Access the Data on Your Computer
Now that you have OpenClaw installed securely, it’s time to give it some access to the data on your computer. The secure setup above isolates the instance, so it can’t access any data and it’s not so much fun to play with.
Usually, it can be nice to start from your research notes or a folder where you store PDF documents or marketing strategies.
For instance, I have an Obsidian vault located at /Users/dmt/Software/Second Brain:/mnt/Obsidian/Second Brain (you can get the full folder path by going to that folder and running pwd from there in Terminal). So I’m going to add this because I want to use OpenClaw on my Obsidian notes. I’ll also add access to the whole Research paper folder I have, because it’s just public research papers and I want to analyze their content as well.
In order to give access, you need to add it into the agents.defaults.sandbox.docker.binds configuration:
"sandbox": {
	"mode": "all",
	"scope": "session",
	"workspaceAccess": "none",
	"docker": {
		"network": "bridge",
		"image": "openclaw-sandbox-mcporter:latest",
		"dangerouslyAllowExternalBindSources": true,
		"binds": [
			"/Users/dmt/Software/Second Brain:/mnt/Obsidian/Second Brain:rw",
			"/Users/dmt/Dropbox/Research:/mnt/Dropbox/Research:ro"
		]
	}
}
Here we mapping our local folders to the Docker sandbox folders (e.g. /mnt/Dropbox/Research) and we use two parameters:
ro - means Read only (we cannot write into that folder)
rw - means Read Write (we can read and write from this folder) — I’m OK to use it on my Obsidian vault because it’s a git repository where every change can be reverted (you should do it too on your Obsidian vault).
We also need to set "dangerouslyAllowExternalBindSources": true because that tells OpenClaw to provide access to the Docker folders we mounted.
INSTALLATION NOTE: You need OpenClaw version 2026.2.24 for this to work, as the previous versions had a bug where “dangerouslyAllowExternalBindSources”: true was omitted. To update your OpenClaw installation run
npm update -g openclaw. Check your version usingopenclaw --versionSECURITY NOTE #7: SWITCH OFF ELEVATED TOOL PERMISSION
At this point, you need to switch off your elevated tool permissions because otherwise, even though you limited the scope of your OpenClaw to your Docker mounted folders, the fact that you allow the tools to run outside of the sandboxed environment means that they can still access all your data. You will be prompted every time, so you have some safety there, but for better security deactivate it for now:
"tools": {
    "elevated": {
        "enabled": false
This is basically double protection because you
Now you restart your OpenClaw:
openclaw gateway restartAnd ask it to check your Obsidian folder:
SECURITY CHECK: Verify that your installation is secure by asking OpenClaw to find some other data on your computer that you know it should not have access to.
4/5. Use OpenClaw from Telegram or WhatsApp
You might want to ensure you have your Telegram / WhatsApp gateway connected, because it’s a lot of fun to be able to interact with your notes on the go. To verify, open your Telegram / WhatsApp chat that you set up when installing OpenClaw and send any message. If you see an error, you’ll probably receive a response with an approval code to run in your Terminal:
openclaw pairing approve telegram YOUR_APPROVAL_CODE4/6. Adding the Browser Capabilities
If you’re using a sandboxed version of OpenClaw, setting up its ability to use the browser (from the sandbox) is not very trivial.
In order to do that, you need to:
4/6/1. Create the Docker container with the browser
Open the Terminal in your local OpenClaw repo to your local machine and then running
docker build -t openclaw-sandbox-browser:bookworm-slim -f Dockerfile.sandbox-browser .After that, you’ll have the browser image available. Then you’ll need to add settings to the configuration file to make sure that the sandboxed version of OpenClaw launches the browser.
4/6/2. Change config to run the browser container
In the agents.defaults.sandbox scope add
"browser": {
  "enabled": true,
  "autoStart": true,
  "autoStartTimeoutMs": 15000,
  "enableNoVnc": true,
  "headless": false,
  "allowHostControl": false
}
In the agents.defaults.sandbox.docker.env add
"OPENCLAW_BROWSER_NO_SANDBOX": "1"Then run openclaw browser --browser-profile sandbox status in your browser and then run OpenClaw again and ask it to open the browser in a new window.
🎉 You can now control browser automations via OpenClaw.
5. Install Additional Skills
Now we come to the most interesting part: generating insights from your data. You can use the OpenClaw web chat or Telegram chat for that.
At this point, you’ll probably want to install additional skills giving your OpenClaw extra capabilities or connecting it to external services, such as Google Drive.
In this example, we will install an additional InfraNodus OpenClaw skill that enables OpenClaw to connect to the InfraNodus MCP server using the mcporter command-line tool. We will use this skill as as example, so we can demonstrate how to inspect and install the skills in a secure way, so you can apply this approach to any other skills as well.
5/1. Installing the InfraNodus Skill / MCP Server to OpenClaw
The easiest way to start using the InfraNodus MCP server is to install the official skill file that contains instructions on using InfraNodus with mcporter which basically turns InfraNodus into a CLI tool (and enables LLMs to invoke it in its calls easily).
The installation instructions can be obtained at https://infranodus.com/skills/cli-use-openclaw
SECURITY NOTE #8: CAREFUL WHICH SKILLS TO INSTALL AND WHERE TO INSTALL THEM
Skills is the most dangerous part of OpenClaw. Always review the skill’s content to ensure that it doesn’t contain any instructions to run malicious terminal commands and also make sure it doesn’t send your data to some external URLs that you never heard of (even if the data it sends to the URL is innocent, the response may contain a prompt injection with a malicious command or code).
Before installing this skill, you need to manually inspect it and see and understand how it works. You need to also verify if you trust the skill’s provider.
For instance, when you review the InfraNodus skill, you can see that:
it’s located in the official infranodus github repo
it comes from a trusted provider — https://infranodus.com
the content of the skill is a wrapper that uses the
mcportertool to communicate with the official InfraNodus MCP server — therefore, no weird externalcurlAPI requeststhe skill itself does not have any instructions to send your sensitive data. It only works with your existing graphs or will use the text that you will yourself ask it to analyze. It also does not upload files anywhere and doesn’t have instructions to list your home directories.
another bonus is that it has nothing to do with crypto — that’s always a red flag, because many skills will just want to steal your crypto wallet under the guise of trading bots
Once verified, if you trust the skill, you can install it directly from OpenClaw:
install this skill into the skills folder: https://github.com/infranodus/skills/releases/download/v1.0.7/skill-cli-use.zip(alternatively, you can copy and paste the contents of the the actual skill file)
If you receive an error (because of too much security restrictions), you can install the skill manually:
Or also download the skill-cli-use from our official skills repo at https://github.com/infranodus/skills/releases
And then copy the skill and unzip it to your ~/.openclaw/workspace/skills folder (or ~/.openclaw/skills to avoid security restrictions and make that skill available to all the workspaces and projects globally):
cp skill-cli-use.zip ~/.openclaw/workspace/skills/skill-cli-use.zip
unzip ~/.openclaw/workspace/skills/skill-cli-use.zip -d ~/.openclaw/skills/skill-cli-use
Then restart OpenClaw:
openclaw gateway restart5/2. Setting Up the InfraNodus Skill API Key
Note, that InfraNodus will work without the API key, but you will hit the rate limits and won’t be able to access your graphs and store / retrieve memories. We recommend to get an API key for better experience.
To add the key, go to the Skills control panel http://127.0.0.1:18789/skills to add the InfraNodus API key which you can get at https://infranodus.com/api-access
After you add this key, it will automatically be added to the main configuration file of OpenClaw at ~/.openclaw/openclaw.json. It will look something like that:
"skills": {
		"entries": {
			"infranodus": {
				"apiKey": "YOUR_INFRANODUS_API_KEY"
			}
		}
	}
IMPORTANT: If you run OpenClaw in a secure sandboxed environment, you will have to manually add this key as an environmental variable to your Docker container. In order to do that, go to the
~/.openclaw/openclaw.jsonfile and then add the following line to the `agents.default.sandboxscope:"env": { "INFRANODUS_API_KEY": "YOUR_INFRANODUS_API_KEY" }
The final setup will look something like:
"sandbox": {
"mode": "all",
"workspaceAccess": "rw",
"scope": "session",
"docker": {
"image": "openclaw-sandbox-mcporter:latest",
"network": "bridge",
"binds": [
"/Users/dmt/Software/Second Brain:/mnt/Obsidian/Second Brain:rw",
"/Users/dmt/Dropbox/Research:/mnt/Dropbox/Research:ro"
],
"dangerouslyAllowExternalBindSources": true,
"env": {
	"INFRANODUS_API_KEY": "YOUR_INFRANODUS_API_KEY"
}
}
}5/3. Revealing the Main Recurrent Topical Clusters with InfraNodus
After the InfraNodus skill is installed and you relaunched OpenClaw and added the InfraNodus API key, you can now invoke InfraNodus to generate better insights with OpenClaw.
For instance, you can ask OpenClaw to list all the Obsidian documents where you mention “fractal” with the standard prompt like
What are the Obsidian docs where I mention "fractals"?After OpenClaw lists all the docs, you can ask:
Pull out those documents and then use InfraNodus to find typical recurrent themes in these.As a result, we will get a list of topics with the influence score:
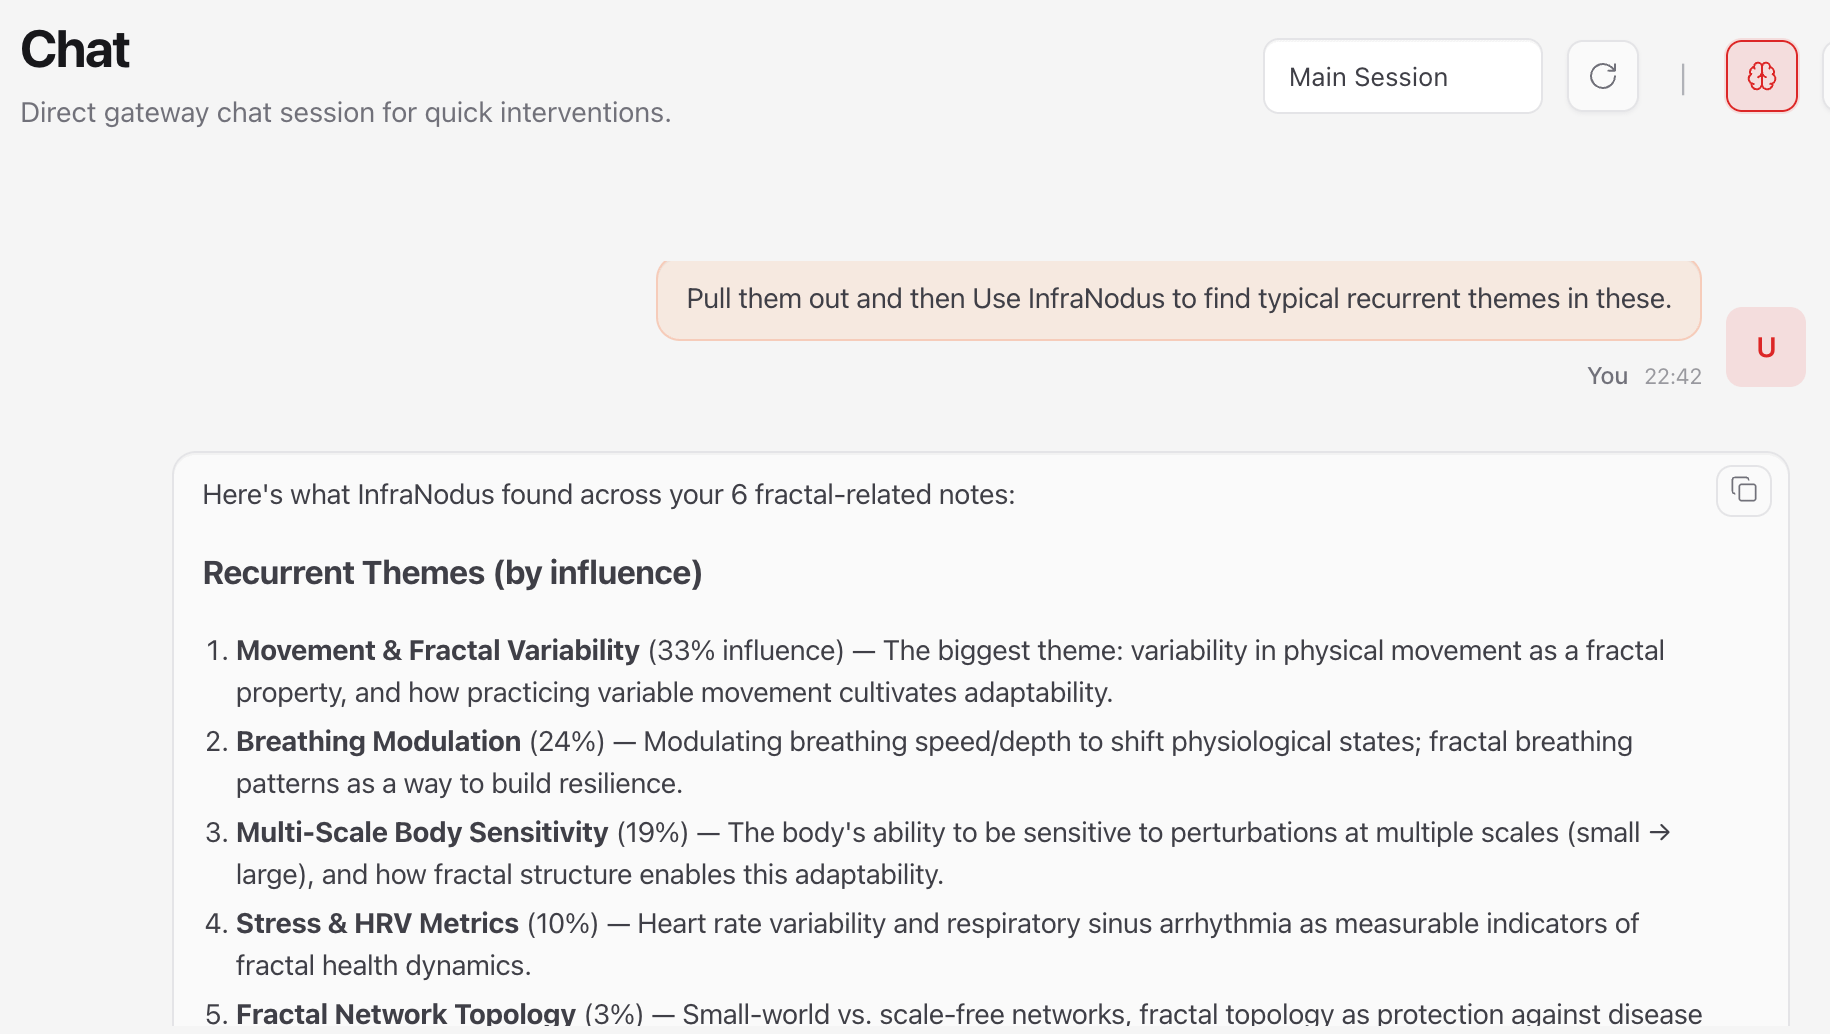
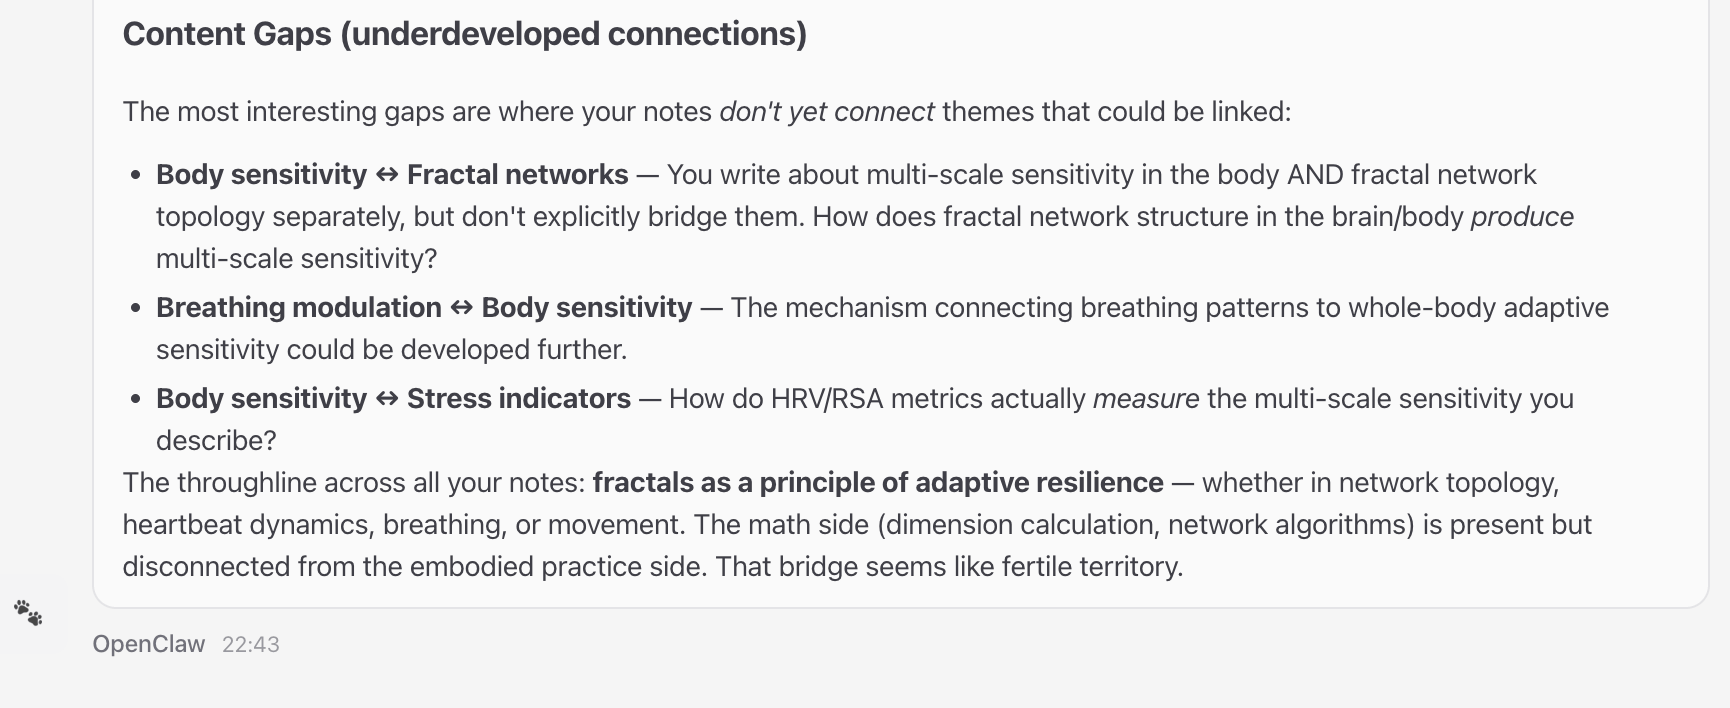
5/4. Revealing the Content Gaps
InfraNodus MCP has a content gap detection tool. It builds a graph of your data, identifies the topical clusters (as described above) and then finds gaps between these themes in order to identify what is missing and what new connections could be made.
This is how it looks in practice: the topics that are furthest apart could benefit from better connections —
Here is the full OpenClaw secure setup guide. If you like what you see, please, consider subscribing to Nodus Labs’ Substack so you can get updated about the latest news on AI and network analysis for researchers and writers.
OpenClaw Security Checklist & Config File
Below is a quick checklist and my own config file to verify if your OpenClaw installation is secure. It also includes the recommended configuration for a sandboxed, isolated setup on a local machine, where you need to approve every step OpenClaw takes to ensure maximum security.